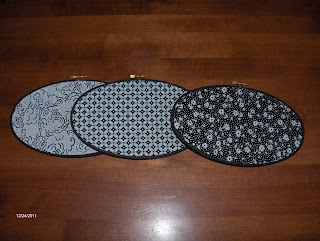
You'll remember that I shared this photo with you, of the wall art I made for Princess' room for her Christmas present. You know, the room that is such a bright yellow you can see it from space?
You can make these with remnants that are in your stash, fat quarters, or about 1/2 yard of all the same fabric, if you'd prefer that look. Of course, how much fabric you need will be determined by how big your hoops are.
So you'll need:
Three wooden embroidery hoops - your choice of size or shape (these were given to me by a friend cleaning out a closet so they were FREE)
Either three fat quarters of fabric or about 1/2 yard of one single fabric - your choice
Acrylic paint - use a color that either matches/coordinates with your fabric or your walls
1" sponge paint brush
Styrofoam plate or paint pallet or other somesuch
Start by spreading newspapers over your work surface. Place your hoops, separated I might add, on the newspaper.
Pour some paint on your pallet-of-choice, and dip only the chiseled edge of your sponge brush into the paint.
Carefully, paint the wide, outside part of the outer hoop. Because these hoops were unfinished wood, they took three coats. Allow each coat of paint to dry completely before you add another coat. After you've done the wide part of the outside, do the little narrow band that will face the front. This is where that chisel shape really comes in handy! Be sure to do the same number of coats of paint.After all the paint is dry, place the fabric over the inner hoop, place the outer hoop over top, and tighten with the thumbscrew at the top of the hoop. You can choose to feature certain parts of the fabric this way, which is really useful. For example, on the white fabric, I chose to feature a section that has flowers that are nearly identical to the flowers on Princess' new comforter. If I felt ambitious, I could have used fabric paint to color them in. At the time, I didn't think of it, but if you want, it's an idea that may be worth trying. But, I digress...
Once you've got your fabric locked in, trim the back as close to the embroidery hoop as possible. In the end, I used my embroidery scissors to get in really close. Here they are again, so you don't have to scroll all the way back to the top:
To make these, I spent less than $5. Like I said, the hoops were a gift, and almost everything else I had on hand (paint, brush, one of the fabrics). The only money I spent was on 2 fat quarters - they were on sale and I used my teacher discount (remember your new mantra "on sale and with a coupon"). Now if you were to purchase everything from scratch - the paint was about 75 cents, each fat quarter was about a dollar, and I believe you can get the hoops for about a dollar also. The sponge brushes are also really cheap.
Make one or a dozen - have some fun with leftover fabric and give it a go!
This post linked up to several parties and TidyMom.


10 comments:
I love this. My Mom made these back when I was young, but back then, they looked country and were framed in lace. This looks so nice and modern. A perfect fit for my nieces. Thank you for sharing such a cool idea.
What a cute project! Thanks for sharing! :)
This is on my list for decorating my craft room, they look great!
I may have to try this I have a lot of left over fabric form quilting.
You can frame cross stitch pieces like this also...really cute for a kitchen, bathroom or gift!
I love the fabric you used! I'm your newest follower from A Creative Princess, please stop by my blog sometime!
http://chickenscratchny.blogspot.com
Very cute and I love the fabric you used. I stopped by from Fingerprints on the Fridge and am a new follower. Stop by my blog sometime.
http://funkymomcards.blogspot.com/
I have so much left over fabric, I may give this a try!
So pretty--I have some old embroidery hoops around here somewhere! Great idea--love the black.
Hello Suburban Prairie Homemaker,
I am dropping by to thank you for sharing this adorable DIY project on The Country Homemaker blog hop last year. I wanted to share with you that this post was the 4th most popular post of the year for the hop.
http://mysimplecountryliving.blogspot.com/2013/02/the-country-homemaker-hop-53.html
Thanks again.
Heidi
Post a Comment